Emulating an Old-World LoongArch64 VM with QEMU
LoongArch64 has an awkward bit of history: the ecosystem is often described as split between “old world” (旧世界) and “new world” (新世界). For the kind of server images I care about here, especially KylinOS Server and UnionTech OS Server, the practical target is still old-world compatibility.
That is why the firmware file matters. A newer LoongArch64 UEFI build is not automatically better for these guests. For this workflow, QEMU_EFI_7.2.fd is the boringly useful choice: old enough to match the systems being installed, but still aligned with QEMU’s LoongArch64 support era.
I have shared my copy here:
The file I am using is 3,801,088 bytes. Its SHA256 checksum is:
59ab6e18af0ca75ff1556ebb4b6ad640ffbf09499710e655172254f93a2d63ba
You can verify it after downloading:
shasum -a 256 QEMU_EFI_7.2.fd
This post is about full-system emulation, not native virtualisation. On an x86_64 or Apple Silicon host, LoongArch64 can be quite slow. If a guest has not reached the installer or booted system after a long time, the problem may be firmware, guest compatibility, or host QEMU support rather than just patience.
Table of Contents
Install QEMU
On macOS, Homebrew is the easiest way to install QEMU:
brew install qemu
qemu-system-loongarch64 --version
qemu-system-loongarch64 -machine help
qemu-system-loongarch64 -cpu help
On Linux, install the package that provides qemu-system-loongarch64. For example, on a Fedora-like host:
dnf install -y qemu-system-loongarch64 qemu-img
QEMU 7.2 or newer is strongly preferred. QEMU 7.1 introduced initial LoongArch support, and QEMU 7.2 included important updates. In practice, I would not spend time debugging old QEMU builds for this.
UTM is worth knowing about on macOS because it is a pleasant QEMU-based VM manager. It can emulate a LoongArch64 VM, so the point is not that UTM is unavailable. For this old-world cloud-image workflow, though, I still prefer the direct qemu-system-loongarch64 command because the firmware, device, monitor, and forwarding options are easier to reproduce exactly.
Prepare the files
Create a working directory:
mkdir -p ~/VMs/loongarch64
cd ~/VMs/loongarch64
Put these files in that directory:
QEMU_EFI_7.2.fd, downloaded from one of the cloud-drive links above.- A LoongArch64 server ISO, such as KylinOS Server or UnionTech OS Server.
- A qcow2 disk created for the VM.
Create the disk with qemu-img:
qemu-img create -f qcow2 KylinOS-Server-loongarch64.qcow2 40G
Adjust the filename and size for your own guest. These systems are Red Hat-like, so a 40 GB disk is a reasonable starting point for a small build or image-preparation VM.
Boot from an ISO
Use this shape when installing a fresh LoongArch64 server guest from an ISO:
qemu-system-loongarch64 \
  -M virt \
  -bios QEMU_EFI_7.2.fd \
  -cdrom KylinOS-Server-loongarch64.iso \
  -chardev socket,id=qemu-ga.0,path=qemu-ga.sock,server=on,wait=off \
  -cpu la464-loongarch-cpu \
  -device nec-usb-xhci,id=xhci,addr=0x1b \
  -device usb-kbd,id=keyboard,bus=xhci.0,port=2 \
  -device usb-tablet,id=tablet,bus=xhci.0,port=1 \
  -device virtio-gpu-pci \
  -device virtio-serial \
  -device virtserialport,chardev=qemu-ga.0,name=org.qemu.guest_agent.0 \
  -hda KylinOS-Server-loongarch64.qcow2 \
  -m 2G \
  -monitor telnet:localhost:5555,server=on,wait=off \
  -net nic,model=virtio \
  -net user,hostfwd=tcp::10000-:22 \
  -smp 2 \
  -vnc 0.0.0.0:1
For UnionTech OS Server, keep the same command structure and replace the ISO and qcow2 filenames. The main point is not the exact distribution name; it is the combination of qemu-system-loongarch64, -M virt, QEMU_EFI_7.2.fd, la464-loongarch-cpu, VirtIO devices, VNC, QEMU Guest Agent wiring, and SSH port forwarding.
Connect with a VNC viewer to the host’s display :1, which normally means TCP port 5901. If you add --serial stdio, QEMU will also print serial output in the terminal, which can be useful when the graphical display is quiet.
During installation, treat the guest as a Red Hat-like system:
- Use VirtIO-backed disk and network devices.
- Install or keep
qemu-guest-agentif the image-preparation workflow needs guest-agent operations later. - Ensure SSH is installed and enabled if you want to log in through the forwarded host port.
- Keep the firmware file and qcow2 disk together so the boot command stays reproducible.
Boot an installed qcow2
After installation, stop the emulation session and boot from the qcow2 disk without -cdrom:
qemu-system-loongarch64 \
  -M virt \
  -bios QEMU_EFI_7.2.fd \
  -chardev socket,id=qemu-ga.0,path=qemu-ga.sock,server=on,wait=off \
  -cpu la464-loongarch-cpu \
  -device nec-usb-xhci,id=xhci,addr=0x1b \
  -device usb-kbd,id=keyboard,bus=xhci.0,port=2 \
  -device usb-tablet,id=tablet,bus=xhci.0,port=1 \
  -device virtio-gpu-pci \
  -device virtio-serial \
  -device virtserialport,chardev=qemu-ga.0,name=org.qemu.guest_agent.0 \
  -hda KylinOS-Server-loongarch64.qcow2 \
  -m 2G \
  -monitor telnet:localhost:5555,server=on,wait=off \
  -net nic,model=virtio \
  -net user,hostfwd=tcp::10000-:22 \
  -smp 2 \
  -vnc 0.0.0.0:1
Then SSH through the forwarded port:
ssh root@localhost -p 10000
If the guest has no network, first use VNC or serial output to inspect it:
ip addr
systemctl status sshd
systemctl status qemu-guest-agent
On KylinOS Server or UnionTech OS Server, the package-management commands should feel familiar if you have used RHEL-like systems:
dnf install -y openssh-server qemu-guest-agent
systemctl enable --now sshd qemu-guest-agent
Use QEMU Monitor
The -monitor telnet:localhost:5555,server=on,wait=off option opens a QEMU Monitor endpoint. Connect to it from the host:
telnet localhost 5555
Common monitor commands:
info status
info block
system_powerdown
system_reset
quit
system_powerdown is the polite option if the guest supports ACPI shutdown. quit stops QEMU directly and can lose guest data, so I only use it when the VM is disposable or already stuck.
For more monitor commands, see the QEMU Monitor documentation.
Confirm the architecture
Inside the guest:
uname -m
uname -a
The first command should print:
loongarch64
At that point the VM is ready for the usual Red Hat-like server chores: package updates, qemu-guest-agent checks, image clean-up, kernel clean-up, and whatever build or compatibility work needed a LoongArch64 environment in the first place.
Optional: use UTM on macOS
If you prefer a GUI, UTM can be configured for this kind of VM as well. I would treat it as a convenience path rather than the main recipe, because the command line is easier to copy, audit, and rerun during image work.
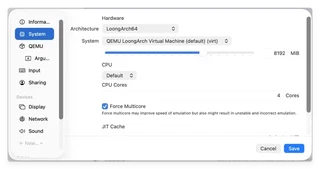
The important system settings are:
- Architecture:
LoongArch64. - System:
QEMU LoongArch Virtual Machine (default) (virt). - CPU:
Default, or the closest available LoongArch CPU setting exposed by your UTM build. - Memory and CPU cores: choose values that match your host. LoongArch64 emulation is slow, and checking
Force Multicoremay help sometimes.
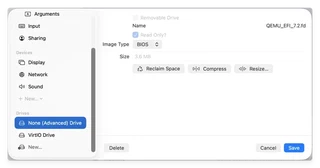
Add QEMU_EFI_7.2.fd as a drive with image type BIOS, and keep it read-only.
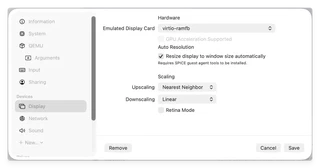
For display, virtio-ramfb is a useful starting point.
You still need the same guest-side checks after installation: SSH, qemu-guest-agent if required, VirtIO networking, and uname -m showing loongarch64.
